You have a great idea in your head, but you might not have the technical skills to draw or paint it. Artificial intelligence has changed that by giving everyone the power to build visuals from simple descriptions. You can now take a rough thought and turn it into a high-quality image or a moving scene in just a few minutes. This guide will show you how to navigate these tools to get the best results for your projects.
Creating visual content used to take weeks of training and expensive software. Now, you can transform existing images into new designs by using smart algorithms that understand style and composition. This process allows you to keep the basic structure of a photo while changing the artistic medium, the lighting, or the overall mood. It is a great way to refresh old content or experiment with different looks without starting from zero.
If you want to take things a step further, you can even create videos with AI-powered workflows that turn static concepts into moving stories. These tools analyze your prompts and images to build frames that flow naturally together. It is a powerful way to bring your brand or personal projects to life without needing a massive production budget or a team of animators. You need a clear vision and the right set of instructions to get started.
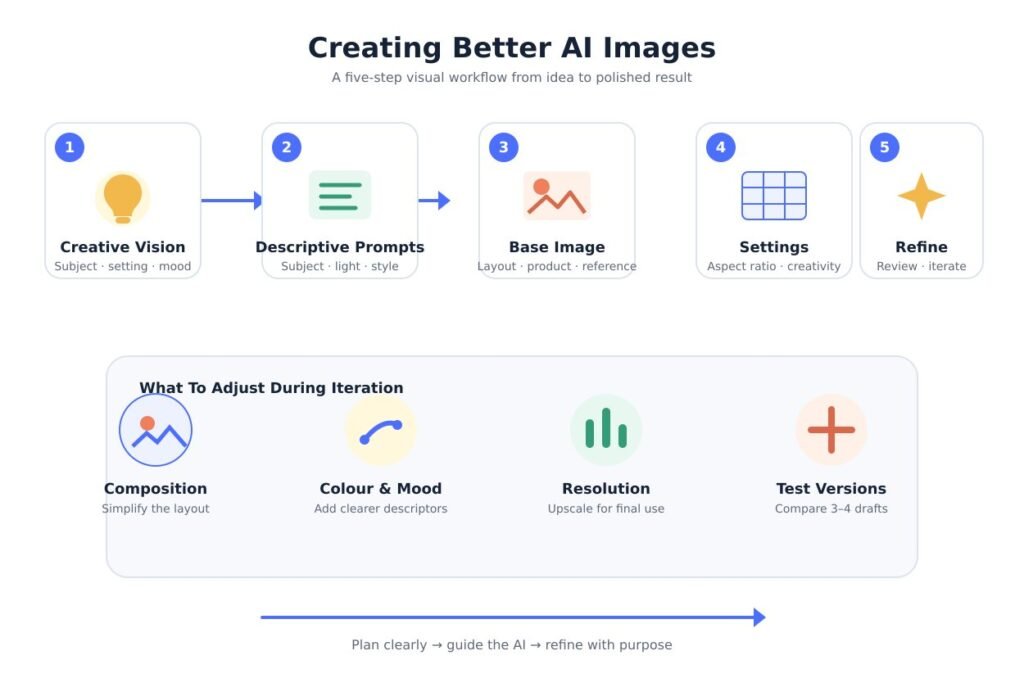
Step 1: Define Your Creative Vision
The first step in any creative project is knowing what you want to achieve. You should start by writing down the core elements of your idea. Think about the subject, the setting, and the emotion you want to convey. If you are too vague, the AI will make guesses that might not match what you have in mind. Instead of just saying a cat, try saying a fluffy ginger cat sitting on a wooden porch during a sunset.
You should also consider the purpose of your content. A social media post might need bright colors and high contrast to grab attention, while a professional presentation might require a more muted and clean look. Knowing your audience helps you choose the right descriptors later in the process. Take a moment to sketch out your idea on paper or write a few bullet points to keep yourself on track.
Step 2: Write Descriptive Prompts
A prompt is the set of instructions you give to the AI. To get the best results, you need to use clear and strong verbs. Avoid using filler words that don’t add meaning to the image. Focus on the subject, the environment, the lighting, and the camera angle. For example, mentioning a wide-angle lens will give you a very different result than a close-up macro shot.
You can also include specific art styles in your prompts. You might want something that looks like a charcoal sketch, an oil painting, or a 3D render. Mentioning these styles helps the software narrow down the visual library it uses to generate your content. Don’t be afraid to be specific about the lighting, such as golden hour, neon lights, or soft morning mist. These details make the final product feel much more intentional.
Step 3: Use a Base Image for Better Control
Sometimes words aren’t enough to describe a specific layout. In these cases, using a reference image is the best way to guide the AI. You can upload a photo you took or a rough drawing you made. The software uses this as a template for the new creation. This ensures that the main objects stay in the right places while the AI applies new textures and styles over them.
This method is especially useful for branding. If you have a specific product shape, you can use a photo of it and ask the AI to place it in different environments. You can change a product shot from a plain studio background to a lush forest or a futuristic city while keeping the product itself recognizable. It saves a lot of time compared to traditional photo editing.
Step 4: Adjust Settings and Parameters
Most AI tools come with settings that let you fine-tune the output. You should look at the aspect ratio first. A square image works well for some platforms, but you might need a vertical 9:16 ratio for stories or a horizontal 16:9 ratio for videos. Setting this correctly from the start prevents your images from being stretched or cropped awkwardly later.
You should also look at the stylization or creativity slider if your tool has one. A lower setting will follow your prompt or base image very closely, while a higher setting gives the AI more freedom to add its own creative flair. Finding the right balance is key to getting a result that looks professional but still matches your original vision. You might need to run the process a few times to find the sweet spot.
Step 5: Refine and Iterate
Rarely is the first result perfect. You should treat the first generation as a draft. Look at what worked and what didn’t. If the colors are off, add more color descriptions to your prompt. If the composition is too crowded, simplify your instructions. Most creators go through three or four versions before they find the one they really like.
You can also use tools to upscale your images. AI generation often produces files that are small in size. Using an upscaler will increase the resolution and add fine details, making the image look sharp even on large screens. This is a crucial step if you plan on printing your work or using it for high-quality digital marketing.
Tips and Best Practices
To get the most out of your AI tools, you should follow a few simple rules. These will help you save time and produce better work.
| Tool Type | Primary Use | Best For |
|---|---|---|
| Text to Image | Creating from scratch | New concepts and ideas |
| Image to Image | Modifying existing art | Consistency and rebranding |
| Video Generation | Adding motion | Social media and storytelling |
| Upscalers | Improving quality | Printing and high-res displays |
One of the best tips is to use negative prompts. These are things you do not want to see in your image. If you find that the AI keeps adding blurry backgrounds or extra objects, you can specifically tell it to avoid those things. This gives you much more control over the final composition.
Another tip is to keep your prompts organized. If you find a combination of words that works well, save it in a document. You can reuse these prompt structures for future projects to maintain a consistent style across all your content. Consistency is very important for building a recognizable brand or social media presence.
Common Mistakes to Avoid
Many beginners make the mistake of writing prompts that are too long. If you provide a paragraph of text, the AI might get confused and ignore half of your instructions. It is better to use short, descriptive phrases separated by commas. This helps the software weigh each part of your request more effectively.
Another common error is ignoring the lighting. Lighting is what makes an image look realistic or professional. If you don’t specify a light source, the AI might default to flat, boring lighting. Always try to include at least one word about the light, such as backlit, cinematic lighting, or harsh shadows.
Finally, don’t forget to check for artifacts. AI can sometimes struggle with small details like human hands or symmetrical patterns. Always zoom in and look closely at the details before you publish your work. If something looks strange, you can use an inpainting tool to fix just that specific part of the image without changing the rest of the design.
Conclusion
Turning your ideas into creative AI content is a skill that improves with practice. By starting with a clear vision and using descriptive prompts, you can bridge the gap between imagination and reality. Using base images gives you the control you need for professional work, while video tools allow you to expand your storytelling.
Remember to iterate and refine your results. Don’t be discouraged if the first try isn’t exactly what you wanted. Use the settings available to you, avoid common mistakes like overcomplicating prompts, and always keep an eye on the details. With these steps, you can produce stunning visuals that capture your audience’s attention and bring your creative projects to life.
Disclaimer
This article is provided for general information only. AI tools change quickly, so features, settings and pricing may differ from what is described here by the time you read it. Always check the current documentation and terms of service of the platform you are using, and confirm the ownership and permitted use of anything you generate, as rules vary by country and by provider. Nothing in this article is legal advice.