



The most valuable lesson from my time testing Invideo AI had very little to do with writing a clever prompt. It came from seeing the practical details before pressing generate: the model, credit cost, processing estimate, duration, resolution, aspect ratio and visibility setting.
That information creates a useful pause between having an exciting idea and spending money on it.
Without that pause, it is easy to treat every first thought as though it deserves a premium video render. Usually, it does not. Most first prompts are still carrying unanswered questions about framing, movement, colour, product placement or audience. Paying for the most advanced model before those questions are settled is an expensive way to find out that the basic idea was not ready.
The workflow that worked best for me was straightforward: test uncertainty cheaply, gain approval early and reserve the costly render for a direction that has already earned it.
Generator Became My Preflight Checklist
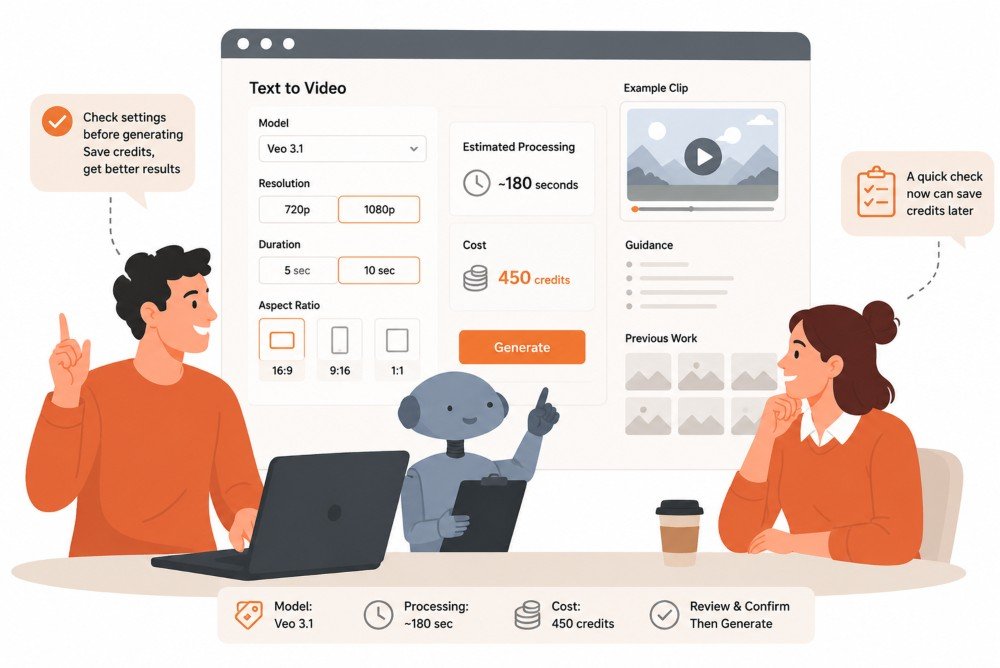
In the version of the text-to-video screen I tested, the selected model was Veo 3.1. The interface estimated roughly 180 seconds of processing and displayed a cost of 450 credits.
The prompt and generation settings appeared on the left, while an example clip, guidance and previous work remained visible on the right. I could choose between:
- 720p and 1080p resolution
- Five-second and ten-second durations
- 16:9, 9:16 and 1:1 aspect ratios
These figures should be treated as a snapshot of the interface I saw, not as permanent prices. Model access, processing estimates and credit charges can change. The platform’s official guide to plans and credits explains that different generative actions consume credits and that model pricing may vary.
What mattered was not the exact number. It was the fact that the cost appeared before generation. I could look at the price and ask whether the prompt was genuinely ready.
That question saved more credits than any prompt formula.
Decide Where the Video Will Appear Before Creating It
Aspect ratio is not a small formatting choice to make after the video has been generated. It affects the entire composition.
A landscape product demonstration may need space around the subject for a website banner, presentation or standard YouTube upload. A vertical social clip needs the important action kept inside a narrower central frame. A square video may work well in some feeds, but it can restrict wide camera movement.
YouTube identifies 16:9 as its standard desktop video ratio, although its player adapts to vertical and square uploads. Its video resolution and aspect-ratio guidance is worth checking before preparing a final export.
Meta also recommends different ratios for different placements. Its aspect-ratio guidance for video placements recommends landscape content for some in-stream environments and vertical creative for full-screen mobile placements.
This means a team should not ask for “one video for every platform” without discussing how it will be reframed. A shot composed for 16:9 can lose the product, actor or key movement when cropped to 9:16.
I now add the destination to the brief before writing the visual prompt:
| Intended use | Useful starting format | Main framing concern |
|---|---|---|
| Website or YouTube video | 16:9 | Leave room for titles and wide movement |
| Reels or vertical social ads | 9:16 | Keep the subject and action near the centre |
| Square social post | 1:1 | Avoid important details at the outer edges |
| Internal concept review | Match final format | Test the real composition, not a convenient substitute |
The draft does not need final resolution, but it should use the final shape. Otherwise, the team may approve a composition that cannot survive the required crop.
Give Short Clips One Clear Job
Duration also changes what a prompt can reasonably achieve.
A five-second clip is usually strongest when it contains one clean visual idea. A trainer lands on wet pavement. A bottle rotates under studio lighting. A camera moves slowly towards a cabin window.
Trying to include an establishing shot, product reveal, character reaction and closing movement in five seconds often creates a confused result. The model may rush through several actions, ignore one of them or unnaturally combine them.
A ten-second clip provides more room, but it still benefits from restraint. It may support a brief sequence, such as:
- The camera approaches the product.
- The product turns towards the light.
- The final frame settles into a clean advertising composition.
Google’s Veo prompt guide recommends describing the scene and action clearly rather than relying on a vague cinematic label. The official Veo 3.1 model page also confirms that the model supports text-to-video and image-to-video generation.
The practical lesson is that duration should be decided from the amount of action required. It should not be selected simply because the longer option appears to offer better value.
Write the Failure Condition Before the Prompt
Before generating a clip, I began writing down six things:
| Prompt component | Question to answer |
|---|---|
| Subject | What must remain recognisable? |
| Action | What is the single most important movement? |
| Camera | Is it fixed, tracking, panning or moving closer? |
| Lighting | What time, mood and light source should appear? |
| Destination | Where will the finished clip be published? |
| Failure condition | What mistake would make the result unusable? |
The failure condition turned out to be one of the most useful parts of the brief.
For a fashion clip, it might be distorted hands, changing clothing details or an inconsistent face. For a product video, it might be the wrong bottle shape, a moving logo or a label that becomes unreadable. For a property visual, it might be doors and windows shifting position as the camera moves.
Writing this down creates a stop rule. When the failure appears, the team does not keep generating similar clips and hoping that one will accidentally work. It pauses, changes the reference material or routes the task to a different model.
This is especially important when several people are using the same credit allowance. Without an agreed failure condition, one person may generate ten more versions of an idea that another stakeholder would have rejected after the first.
Use the Model Library as a Routing Table
After reviewing the generator, I moved into the In Video AI model library. At the time of my test, it contained 32 model pages and placed task categories before individual model cards.
That order encouraged a more sensible question: what type of output does the project need at this stage?
It may need:
- A still image to confirm the composition
- A moving shot based on an approved image
- A voice track
- A music bed
- An avatar performance
- A higher-resolution final asset
Only after identifying the task should the team select the model.
This matters because “best model” is not a useful production category. A powerful text-to-video model may be completely unnecessary when the immediate problem is choosing the background colour or deciding where the product should sit in the frame.
I started treating the model library as a routing table rather than a shop window. Exploration went towards the cheaper tools. Approved visual ideas moved towards image-to-video. Premium generation was reserved for shots that needed stronger motion, realism or continuity.
Build the First Draft Where Mistakes Cost Less
The platform’s image composer gave me a cheaper starting point. During my test, it showed Nano Banana 2, a 16:9 canvas, 1K Lite output and an estimated charge of nine credits.
Compared with the 450-credit video option shown in the same testing session, a still image was a far more sensible place to answer basic creative questions.
- Could the audience understand the visual idea immediately?
- Was the product large enough?
- Did the colour palette feel appropriate for the brand?
- Was the setting too busy?
- Did the composition still work when viewed on a phone?
A still frame cannot prove that motion will work, but it can expose a weak concept before motion is added.
It is also easier to review. A client or colleague can comment on one image and a short motion note without becoming distracted by glitches in an unfinished animation. Once the image is approved, the motion prompt can concentrate on movement rather than trying to invent the scene and animate it at the same time.
My Five-Stage Credit-Saving Workflow
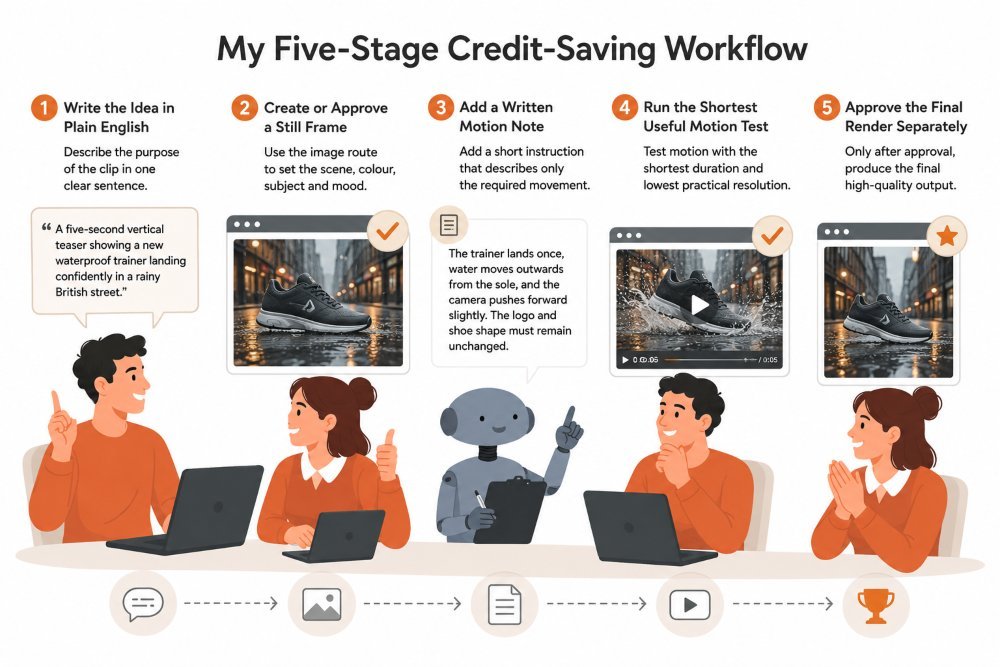
I ended up using five review stages.
1. Write the Idea in Plain English
Before opening the generator, I described the purpose of the clip in one sentence.
For example:
“A five-second vertical teaser showing a new waterproof trainer landing confidently in a rainy British street.”
This sentence was not the final prompt. It was a test of whether the concept was clear enough to brief another person.
2. Create or Approve a Still Frame
I used the lower-cost image route to settle the location, colour, subject position and general mood.
At this stage, I did not worry about perfect texture or final resolution. I wanted to know whether the composition deserved further work.
3. Add a Written Motion Note
Once the still frame worked, I added a short instruction describing only the required movement.
For example:
“The trainer lands once, water moves outwards from the sole, and the camera pushes forward slightly. The logo and shoe shape must remain unchanged.”
4. Run the Shortest Useful Motion Test
The next generation was designed to test motion, not to produce the finished advert. I used the shortest duration and lowest practical resolution available for that decision.
If the movement, identity or product shape failed, I changed the prompt or source image before increasing quality.
5. Approve the Final Render Separately
Only after the concept, composition and movement had passed review did I consider the higher-resolution or more expensive output.
This separated creative approval from technical finishing. It also stopped stakeholders from treating a premium render as an invitation to change the original idea.
Check Visibility and Personal Data Before Uploading
The interface I tested included a public-visibility setting. That deserves the same attention as duration or resolution.
Teams working on an unreleased product, confidential campaign or identifiable customer story should check what will be stored, shared or made visible before uploading source material. A public setting is not something to notice after the render has finished.
The UK Information Commissioner’s Office provides detailed guidance on AI and data protection. It covers areas such as fairness, transparency, security and the lawful handling of personal data in AI systems.
My practical rule is not to place confidential names, customer records, private faces or unreleased product files into a tool until its settings, terms and internal company policy have been checked.
Copyright Still Needs a Human Decision
Generating an asset does not automatically make every element safe to publish.
A prompt may produce something too close to protected artwork, branded packaging or a recognisable person. Uploaded reference material may also contain photographs, music or designs that the team does not have permission to reuse.
The UK government’s report on copyright and artificial intelligence discusses computer-generated works, AI-assisted creativity and concerns surrounding digital replicas of people’s faces and voices.
For commercial work, I would keep a simple record of:
- The final prompt
- The model used
- The source images supplied
- Who approved the concept
- Where music, fonts and brand assets came from
- Any consent obtained for a person’s face or voice
That record is useful when a client later asks how an asset was created or whether the team had permission to use its ingredients.
Do Not Confuse a Polished Render with an Approved Idea
AI video can produce something visually impressive before it produces something strategically useful.
A beautiful shot may still show the wrong product. A realistic actor may not suit the audience. A cinematic camera move may leave no room for the caption. A high-resolution render may be impossible to crop for the platform where the campaign is actually running.
Human review remains necessary at each stage. The UK Government AI Playbook advises users not to trust generative AI outputs uncritically or rely on them without proper judgement.
That principle applies just as strongly to creative production. The model can produce options, but it cannot decide whether the work is accurate, legally suitable, on-brand or worth the credit cost.
Spend Expensive Credits on Confirmed Direction
My rule after this test is simple: spend the cheapest credits on uncertainty and the most expensive credits on decisions that have already been made.
Use writing to settle the purpose. Use a still image to settle the composition. Use a short motion test to settle the movement. Use human review to check the product, rights, privacy and platform fit. Only then pay for the version intended for publication.
A large model library does not automatically create an efficient workflow. Efficiency comes from the order in which the team asks questions.
Prompt, review, route, test, approve and then render.
That order is less exciting than pressing generate immediately, but it leaves more credits available for the shots that are actually worth making.